How to access my EMK cluster?
Estimated time to read: 7 minutes
In this tutorial you learn how to access your Kubernetes cluster and choose the best access method for your use case.
Prerequisites
- Cyso Cloud Account
- An EMK Cluster
- Kubectl, installation instructions can be found here
Access Methods
There are three ways to access your EMK cluster, each designed for different scenarios:
- Time-Limited Access: Quick temporary access via the dashboard (max 24 hours)
- Dynamic Access: Service account-based access for automation and CI/CD
- Structured Authentication (OIDC): Identity provider-based access for teams and organizations
Choose the tab below that best fits your needs:
Time-Limited Access provides quick, temporary access to your cluster through the Cyso Cloud Dashboard. This method is ideal for one-time administrative tasks, troubleshooting, or when you need immediate cluster access without setting up service accounts.
When to use Time-Limited Access
This method is perfect for:
- Quick administrative tasks
- Emergency troubleshooting
- Temporary cluster-admin access for external consultants
- Testing or debugging without setting up permanent credentials
How it works:
- Request a temporary kubeconfig through the Cyso Cloud Dashboard
- Download the kubeconfig file
- Use it to access your cluster until it expires
Key features:
- Quick access: Get a kubeconfig in seconds without additional setup
- Configurable expiration: Choose from 10 minutes up to 24 hours
- Full admin privileges: Always provides
cluster-adminaccess - No service account needed: Direct access through the dashboard
Expiration options
You can set the validity period when requesting the kubeconfig:
- 10 minutes
- 30 minutes
- 1 hour
- 3 hours
- 6 hours
- 12 hours
- 24 hours (maximum)
Getting started:
Step 1: Navigate to your cluster
Find your cluster in the Cyso Cloud Dashboard and select it.
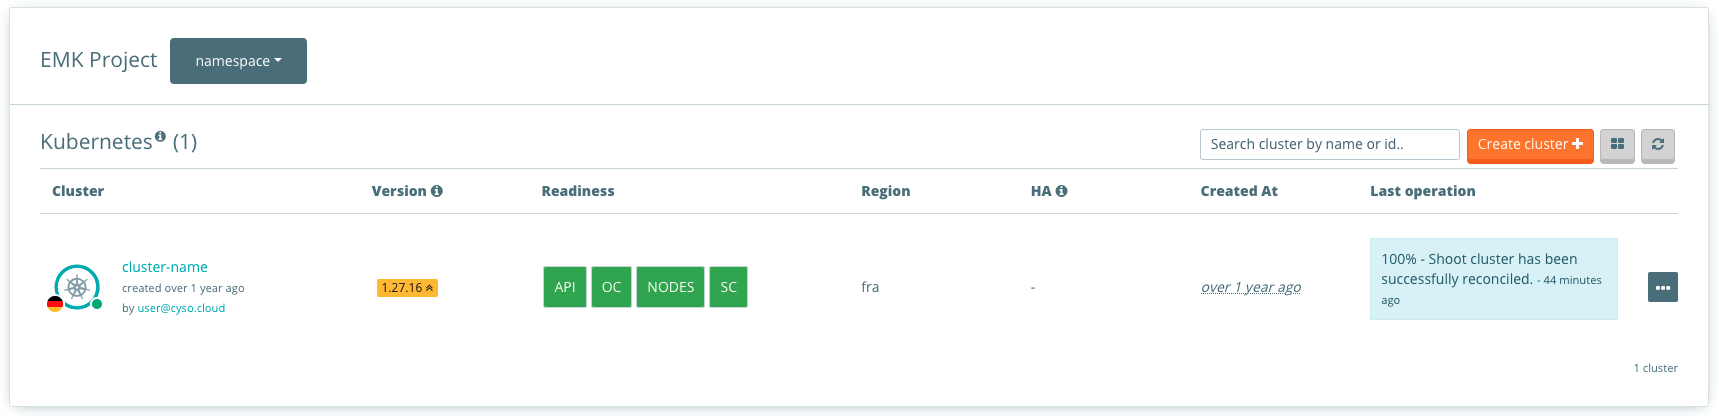
Step 2: Access the cluster details
At the cluster details page, find the Access block.
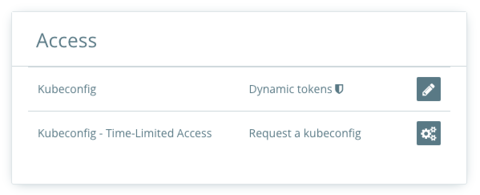
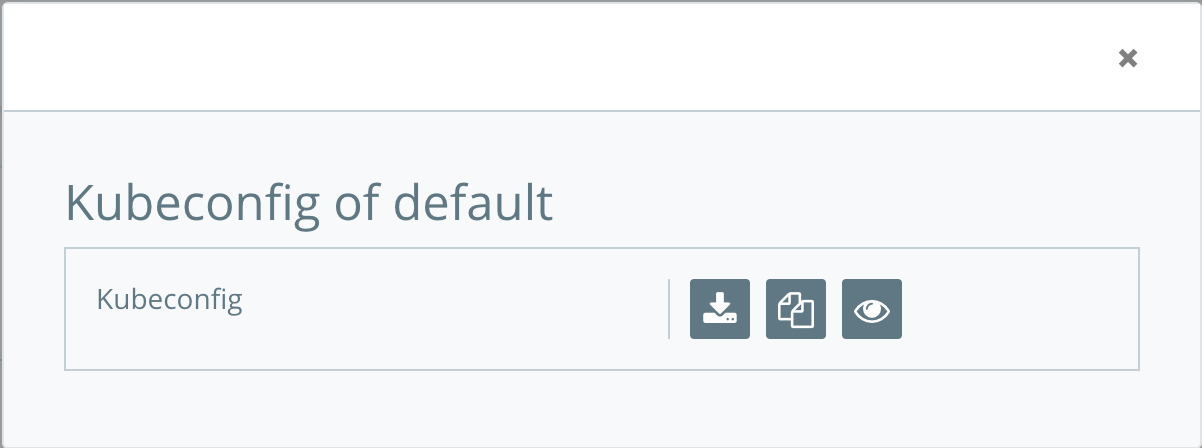
Step 3: Request a kubeconfig
Click on the gears button next to "Request a kubeconfig".
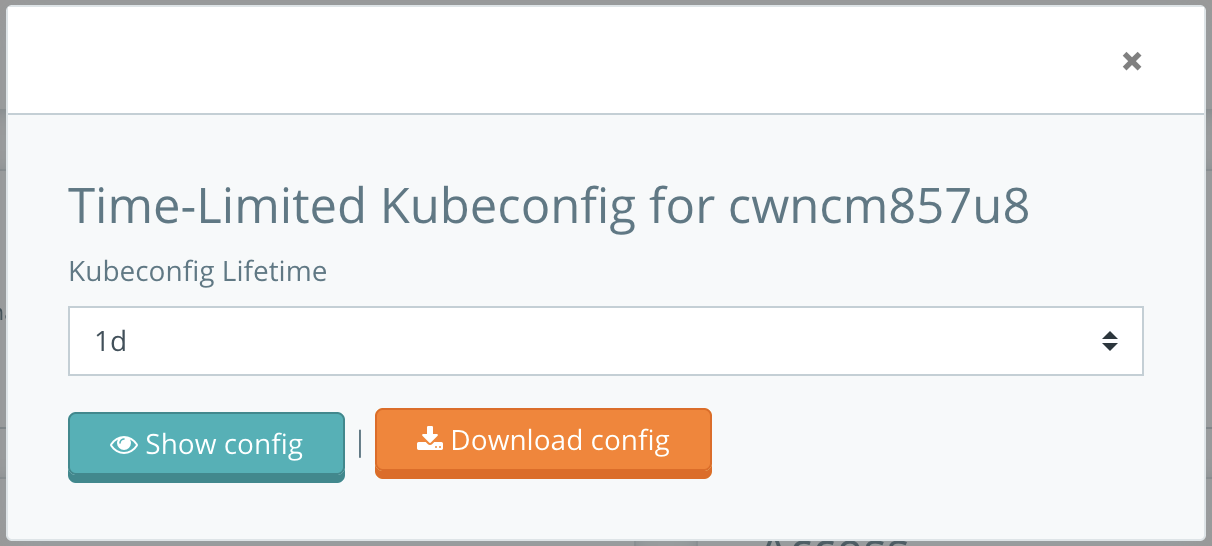
Step 4: Download the kubeconfig
In the popup:
- Select your desired expiration time
- Hit the Download kubeconfig button.
You now have a time-limited kubeconfig file that you can use to access your cluster with full admin privileges.
Expiration
Once the kubeconfig expires, you'll need to generate a new one to continue accessing the cluster. For long-term access or automation, consider using Dynamic access or Structured Authentication (OIDC) instead.
Dynamic access uses a service account to generate temporary kubeconfigs that are valid for up to 24 hours. This method is ideal for automation, CI/CD pipelines, or when you need programmatic access to your cluster.
When to use Dynamic Access
This method is perfect for:
- CI/CD pipelines and automation
- Scripts that need programmatic cluster access
- Applications that interact with the Kubernetes API
- Scheduled jobs requiring temporary credentials
- Integration with third-party tools and platforms
How it works:
- Create or use an existing service account in your EMK project
- Download the service account kubeconfig (valid for 90 days)
- Use the service account kubeconfig to request temporary cluster access
- The temporary kubeconfig expires after your specified duration (max 24 hours)
Access levels:
- Admin:
cluster-adminprivileges - full access to all cluster resources - Viewer: Read-only access to all APIs, except secrets
Prerequisites:
Step 1: Get a service account kubeconfig
Navigate to the Service Accounts tab in your EMK project overview in the Cyso Cloud Dashboard.
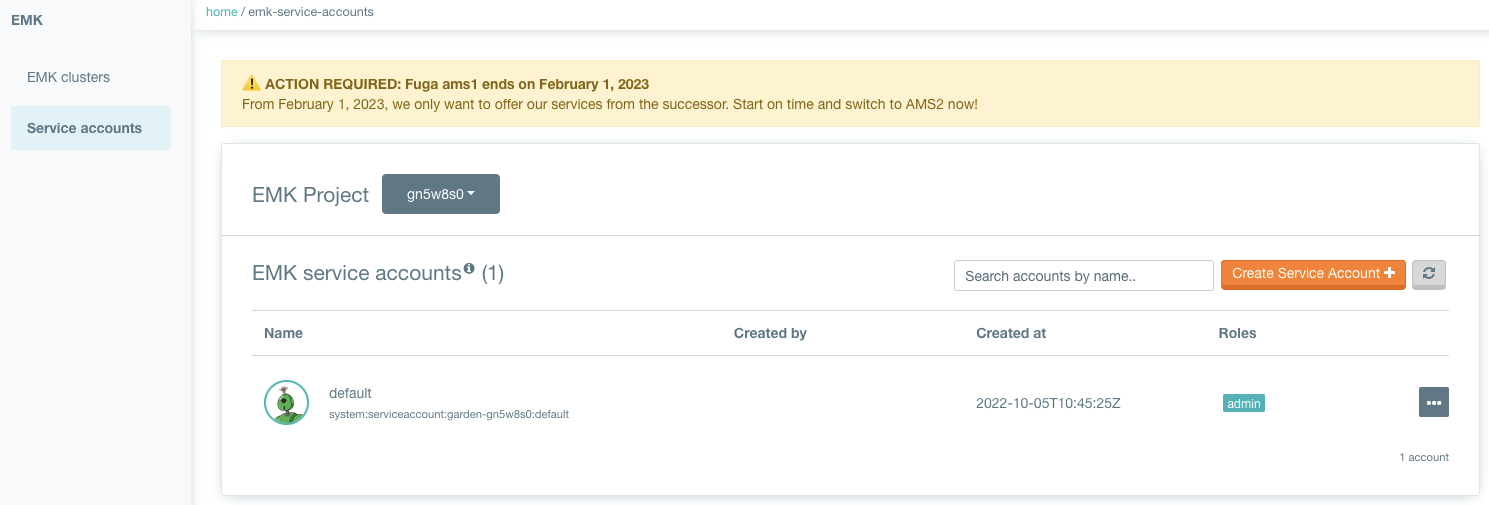
You can use the default service account or create a new one. The service account must have the role admin or viewer.
Click on the "..." menu next to your service account, select "Show kubeconfig", and hit the download button.
Step 2: Request a temporary cluster kubeconfig
Use the service account kubeconfig to request temporary access to your cluster:
Expiration time options
You can set the expiration time for the temporary kubeconfig up to a maximum of 1 day. See below an overview of duration converted into seconds. The seconds can be used in the field: expirationSeconds in the examples below instead of the filled in 3600 seconds.
| Duration | Seconds |
|---|---|
| 10 min | 600 |
| 1 hour | 3600 |
| 8 hours | 28800 |
| 1 day | 86400 |
export KUBECONFIG=/path/to/service-account-kubeconfig.yaml
export NAMESPACE=<your_emk_project_name>
export SHOOT=<your_cluster_name>

kubectl create \
    -f <(printf '{"spec":{"expirationSeconds":3600}}') \
    --raw /apis/core.gardener.cloud/v1beta1/namespaces/${NAMESPACE}/shoots/${SHOOT}/adminkubeconfig | \
    jq -r ".status.kubeconfig" | \
    base64 -d > emk-cluster-${NAMESPACE}-${SHOOT}.yaml
export KUBECONFIG=/path/to/service-account-kubeconfig.yaml
export NAMESPACE=<your_emk_project_name>
export SHOOT=<your_cluster_name>

kubectl create \
    -f <(printf '{"spec":{"expirationSeconds":3600}}') \
    --raw /apis/core.gardener.cloud/v1beta1/namespaces/${NAMESPACE}/shoots/${SHOOT}/viewerkubeconfig | \
    jq -r ".status.kubeconfig" | \
    base64 -d > emk-cluster-${NAMESPACE}-${SHOOT}.yaml
Use the controller-runtime client (>= v0.14.3):
expiration := 10 * time.Minute
expirationSeconds := int64(expiration.Seconds())
adminKubeconfigRequest := &authenticationv1alpha1.AdminKubeconfigRequest{
    Spec: authenticationv1alpha1.AdminKubeconfigRequestSpec{
        ExpirationSeconds: &expirationSeconds,
    },
}
err := client.SubResource("adminkubeconfig").Create(ctx, shoot, adminKubeconfigRequest)
if err != nil {
    return err
}
config = adminKubeconfigRequest.Status.Kubeconfig
Use the native Kubernetes client:
import base64
import json
from kubernetes import client, config
import yaml

# Configuration
shoot_name = "my-shoot"
project_namespace = "garden-my-namespace"

# Load service account kubeconfig
config.load_kube_config(config_file="/path/to/service-account-kubeconfig.yaml")
api = client.ApiClient()

# Request temporary kubeconfig
kubeconfig_request = {
    'apiVersion': 'authentication.gardener.cloud/v1alpha1',
    'kind': 'AdminKubeconfigRequest',
    'spec': {
        'expirationSeconds': 3600
    }
}

response = api.call_api(
    resource_path=f'/apis/core.gardener.cloud/v1beta1/namespaces/{project_namespace}/shoots/{shoot_name}/adminkubeconfig',
    method='POST',
    body=kubeconfig_request,
    auth_settings=['BearerToken'],
    _preload_content=False,
    _return_http_data_only=True,
)

# Decode and use the kubeconfig
decoded_kubeconfig = base64.b64decode(json.loads(response.data)["status"]["kubeconfig"]).decode('utf-8')
print(decoded_kubeconfig)

# Create API client for the cluster
shoot_api_client = config.new_client_from_config_dict(yaml.safe_load(decoded_kubeconfig))
v1 = client.CoreV1Api(shoot_api_client)
You now have a temporary kubeconfig file (emk-cluster-${NAMESPACE}-${SHOOT}.yaml) that you can use to access your cluster.
Structured Authentication allows you to access your EMK cluster using tokens from your organization's identity provider (such as Azure AD, Google, Keycloak, or Zitadel) instead of static kubeconfig files.
When to use Structured Authentication (OIDC)
This method is perfect for:
- Organizations with existing identity providers (Azure AD, Google, Keycloak)
- Teams requiring centralized access management
- Environments needing detailed audit trails
- Multi-user clusters with fine-grained permission requirements
- Long-term daily access for developers and administrators
How it works:
- Your cluster administrator configures OIDC authentication on the cluster
- You authenticate with your organization's identity provider
- The identity provider issues a JWT token containing your identity and group memberships
- Kubernetes validates the token and grants access based on RBAC permissions
Benefits:
- Use your existing organizational credentials
- Automatic token refresh (no manual renewal needed)
- Centralized access management through your identity provider
- Audit trail of who accessed what and when
Getting started:
Before you can use OIDC authentication, your cluster must be configured with Structured Authentication. See the OIDC Authentication Configuration guide for cluster setup instructions.
Once your cluster is configured, you need to set up your local kubectl to use OIDC tokens. Follow the How to setup kubelogin guide for step-by-step instructions on configuring your kubeconfig file with the kubectl oidc-login plugin.
Permissions
Your access level depends on the RBAC roles configured by your cluster administrator. Unlike service accounts with fixed admin/viewer roles, OIDC authentication allows for fine-grained permission control based on your group memberships.
Using Your Kubeconfig
After obtaining your kubeconfig file, you can interact with your Kubernetes cluster using various tools.
Verifying Cluster Access
First, verify that your kubeconfig works and you can access the cluster:
# Set the KUBECONFIG environment variable
export KUBECONFIG=/path/to/your/kubeconfig.yaml

# Verify connection
kubectl cluster-info

# List nodes in your cluster
kubectl get nodes
Expected output:
NAME              STATUS   ROLES    AGE   VERSION
shoot--xxx--xxx   Ready    <none>   42d   v1.31.0
shoot--yyy--yyy   Ready    <none>   42d   v1.31.0
Basic kubectl Commands
Here are some common commands to get started:
# View cluster resource usage
kubectl top nodes

# List all namespaces
kubectl get namespaces

# List pods in all namespaces
kubectl get pods --all-namespaces

# Get detailed information about a specific pod
kubectl describe pod <pod-name> -n <namespace>

# View logs from a pod
kubectl logs <pod-name> -n <namespace>
Using KUBECONFIG
Instead of specifying --kubeconfig with every command, set the KUBECONFIG environment variable:
Add this to your ~/.bashrc or ~/.zshrc to make it permanent.
Alternative Tools
If you prefer a more visual or interactive experience, consider these tools:
k9s is a terminal-based UI that provides a fast and efficient way to navigate and manage your cluster.
Installation:
See how to install k9s.
Usage:
Key features:
- Real-time cluster monitoring
- Quick navigation with keyboard shortcuts
- View logs, describe resources, and execute commands
- Resource filtering and searching
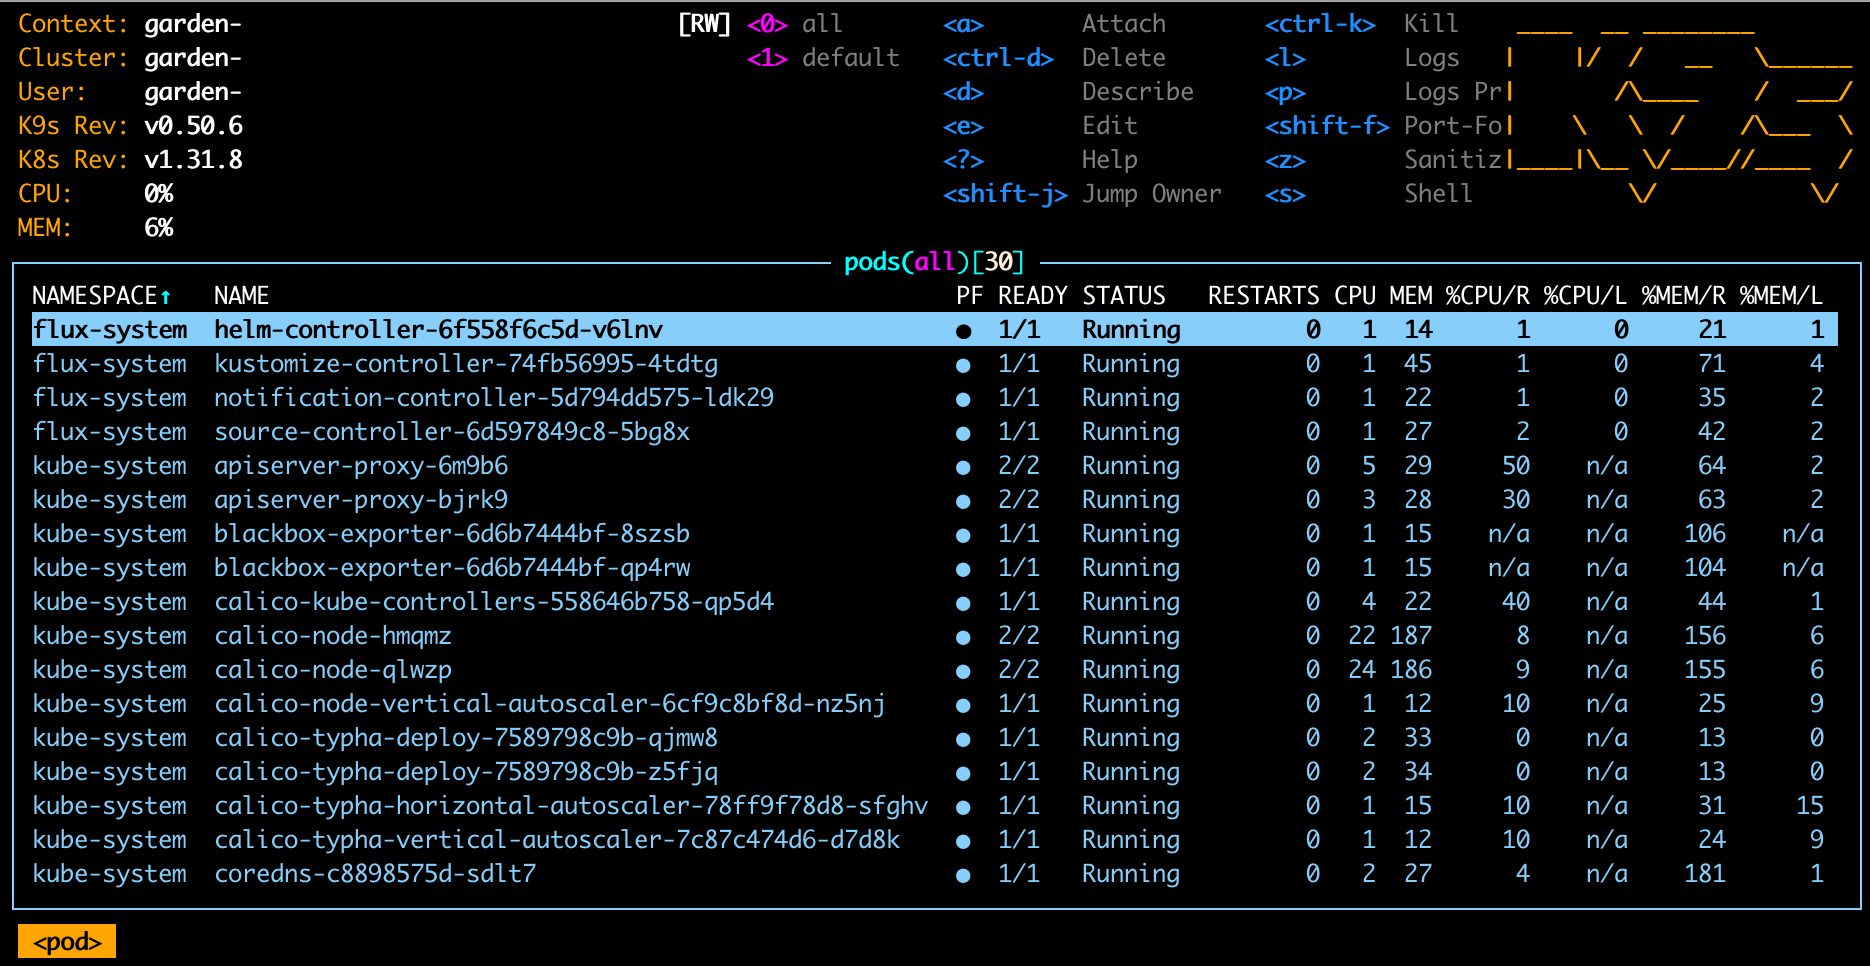
Learn more at k9scli.io
Lens is a powerful desktop IDE for Kubernetes with a graphical interface.
Installation:
Download from k8slens.dev
Connecting your cluster:
- Open Lens
- Click "Add Cluster" or the + icon
- Select "Add from kubeconfig"
- Browse to your kubeconfig file or paste its contents
- Click "Add Cluster"
Key features:
- Visual resource management
- Built-in terminal and logs viewer
- Cluster metrics and monitoring
- Multi-cluster management
- Extension support
Your cluster will appear in the cluster list, and you can explore workloads, resources, and logs visually.
Extend kubectl with useful plugins using krew, the plugin manager:
Installation:
See how to install krew.
Useful plugins: